
Creating beautiful coffee with latte art at home is easier than you might think – and it starts with just two simple ingredients: perfectly pulled espresso and gloriously creamy Cornish milk.
Table of Contents
That elegant heart floating on your morning flat white or the delicate rosetta that makes you pause before that first sip? They’re not reserved for professional baristas. With a little practice and the right milk, you can transform your daily coffee into something truly special. Discover how to create beautiful patterns that are almost too beautiful to drink. Almost.

Why Quality Milk Makes All the Difference
You can have the finest espresso machine and perfect technique, but if your milk isn’t up to scratch, your latte art simply won’t work. It’s not about being fussy – it’s pure science. The magic happens when tiny air bubbles become suspended in milk, creating that glossy, paint-like texture baristas call ‘microfoam’. And the quality of your milk determines whether you’ll achieve silky perfection or disappointing froth.
The Science Behind Silky Microfoam
When you steam milk, the heat unfolds the milk’s proteins, allowing them to wrap around those tiny air bubbles and hold them in a stable foam. At the same time, the fats in the milk add body and creaminess, giving your microfoam that luxurious, velvety texture that pours beautifully.
Here’s where it gets interesting: the protein and fat content of your milk directly affects how well it foams and holds its structure.. Whole milk, with its higher fat content, creates richer, more stable microfoam that’s far more forgiving for beginners. The proteins need to be fresh and intact, too, which is why milk that’s been sitting around for too long just won’t perform the same way.
The ideal temperature for steaming is between 60-65°C. Go hotter and you’ll start breaking down those proteins, creating a thin, lifeless foam that won’t hold your beautiful coffee with latte art patterns. Stay in the sweet spot, though, and those proteins work their magic, creating microfoam that’s glossy, smooth, and thick enough to support intricate designs.
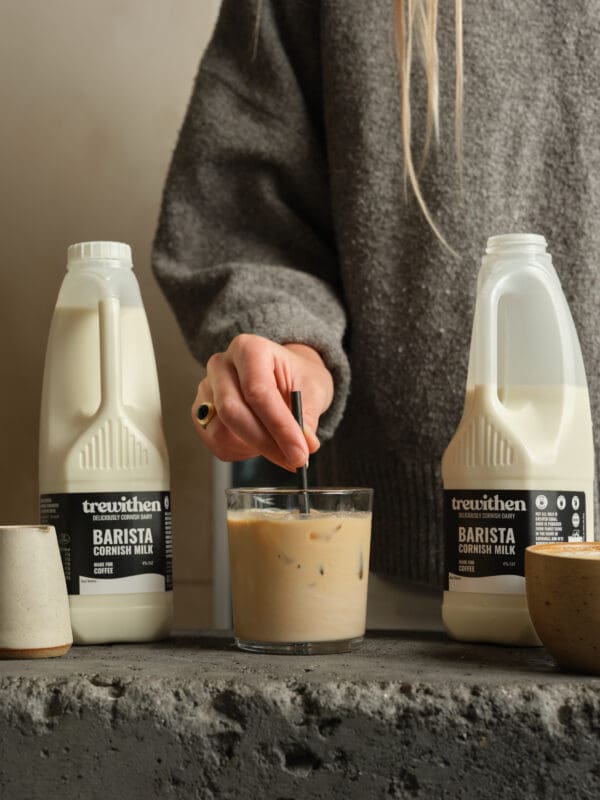
What Makes Cornish Milk Special
Cornwall’s lush, green pastures and mild climate create something special in every bottle of Cornish milk. Grass-fed cows produce naturally creamier milk with a higher butterfat content – that’s the richness you can actually taste in your coffee.
At Trewithen Dairy, we’ve been perfecting our craft for generations. Our milk travels from farm to bottle quickly, keeping it wonderfully fresh with proteins at their peak for creating that perfect microfoam.
Whether you choose our Cornish Gold whole milk for its naturally rich, full-bodied flavour, or our specially formulated Barista milk designed to perform like a professional, you’re getting milk that understands what great coffee needs.
Fresh, creamy, and crafted with care. It’s simply the best foundation for your latte art journey.
Choosing Your Perfect Milk for Latte Art
Not all milk is created equal when it comes to coffee latte art. While any whole milk will give you decent results, choosing milk that’s specifically suited to your skill level and the patterns you want to create can make all the difference. We’ve crafted two options that take the guesswork out of your daily coffee ritual:
Trewithen Barista Milk: Professionally Crafted
Our barista milk is what happens when milk experts team up with coffee experts. Specially formulated with the optimal balance of proteins and fats, it stretches and textures like a dream, creating consistently silky microfoam every single time. This is the milk that professional baristas reach for when they need to nail intricate rosettas and tulips under pressure. If you’re serious about perfecting your technique or want to impress with competition-level pours, Barista milk gives you that professional edge at home in your own kitchen.
Which Should You Choose?
✔ Just starting out on your latte art journey? Cornish Gold is wonderfully forgiving and creates beautifully creamy coffee with rich, natural flavour – perfect while you’re mastering the basics.
✔ Already confident with hearts and working on those trickier patterns? Barista milk will take your skills to the next level with its ultra-consistent performance.
The honest answer? You can’t go wrong with either – both will give you gorgeous results and coffee that tastes absolutely delicious.
Essential Equipment for Coffee with Latte Art
You don’t need a café’s worth of kit to create coffee with latte art at home. With just a few key pieces of equipment and quality ingredients, you’ll be pouring impressive patterns in no time. Let’s look at what actually matters and where you can save a few pennies without compromising your results.
What You’ll Need
At the heart of great latte art is an espresso machine with a steam wand – this is your non-negotiable piece.
You’ll also need:
- A stainless steel milk jug (also called a pitcher)
- Fresh coffee beans and a grinder
- Fresh milk
- A milk thermometer is helpful when you’re learning, though experienced baristas often judge temperature by touch.
Budget-Friendly Alternatives
If you’re not ready to invest in an espresso machine just yet, a stovetop moka pot or French press can create a strong coffee base, though you won’t get true crema.
For frothing, a handheld milk frother can create foam, though it won’t be quite as silky as steam wand microfoam – you might need to practice a bit more with your pouring technique.
The most important investment? Quality milk. Even with simpler equipment, starting with Trewithen’s creamy Cornish milk gives you the best possible foundation for learning latte art without breaking the bank.
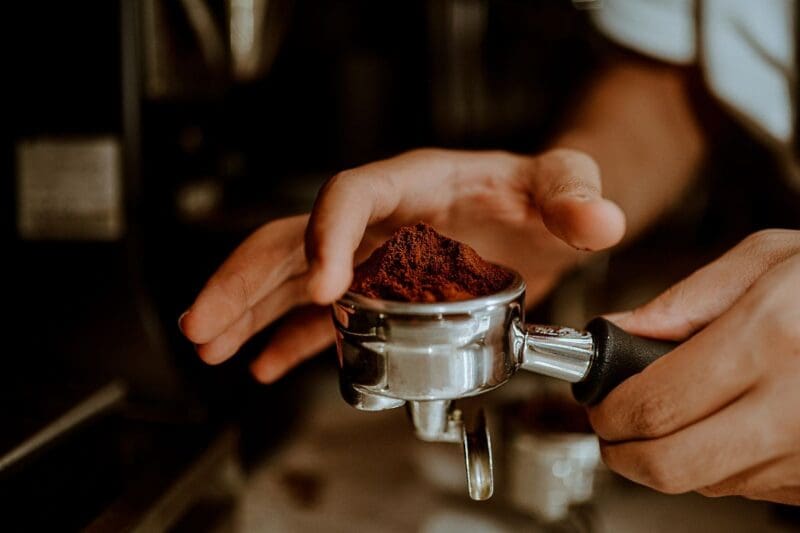
Preparing Your Perfect Espresso Base
Before you even think about pouring milk, you need a solid canvas to work with. Your espresso forms the foundation of every latte art pattern, and getting it right means the difference between designs that pop and ones that disappear into murky brown coffee.
The Foundation of Great Latte Art
A proper espresso shot should have a thick, golden-brown crema on top – that’s the creamy layer that gives your latte art contrast and definition. Aim for a 25-30 second extraction using around 18-20g of freshly ground coffee, and you should end up with a rich, aromatic shot with crema that holds firm.
The crema acts like a canvas, allowing your white milk patterns to stand out beautifully against that deep coffee colour. If your crema is thin or disappears quickly, your latte art will struggle to show through, so it’s worth perfecting your espresso technique first.

Mastering the Milk: Steaming Techniques
This is where the magic happens. Steaming milk properly is an art form in itself, but once you’ve got the technique down, you’ll be creating café-quality microfoam every single time. The key is understanding that steaming happens in two distinct phases: stretching and texturing.
Getting Started: Stretching Your Milk
- Start with cold, fresh milk straight from the fridge – this gives you more time to work and better control.
- Fill your jug about one-third full (the milk will expand significantly).
- Position the steam wand just below the milk’s surface and turn it on full power. You’ll hear a gentle “tsss tsss” sound as air is introduced – this is called stretching. This phase should only last 3-5 seconds and increases your milk’s volume by about a third.
Top Tip: Listen for that papery, tearing sound; if you hear loud screaming or violent spluttering, your wand is either too deep or too shallow.

Creating Silky Microfoam
Once you’ve stretched your milk, plunge the steam wand deeper into the jug to create a whirlpool effect. This is the texturing phase, where those larger bubbles break down into tiny, uniform micro-bubbles that give you that glossy, paint-like consistency.
Keep the whirlpool rolling smoothly – you want the milk spinning in the jug, breaking down any larger bubbles and creating a uniform, velvety texture throughout. This phase continues until your milk reaches the perfect temperature. When you’re done, your milk should look shiny and thick, almost like wet paint, with no visible bubbles on the surface.
Perfect Temperature Every Time
The sweet spot for latte art is 60-65°C – hot enough to bring out milk’s natural sweetness but not so hot that it scalds or becomes thin and lifeless.
If you’re using a thermometer, stop steaming at around 60°C as the temperature will continue rising a few degrees. Without a thermometer? The jug should feel uncomfortably hot to hold but not burning – if you can still keep your hand on it for 2-3 seconds, you’re in the right range.
Once steamed, give your jug a firm tap on the counter to pop any surface bubbles, then swirl it gently to keep that glossy texture uniform. Your microfoam should look thick, creamy, and absolutely perfect – ready to create a beautiful coffee with latte art.

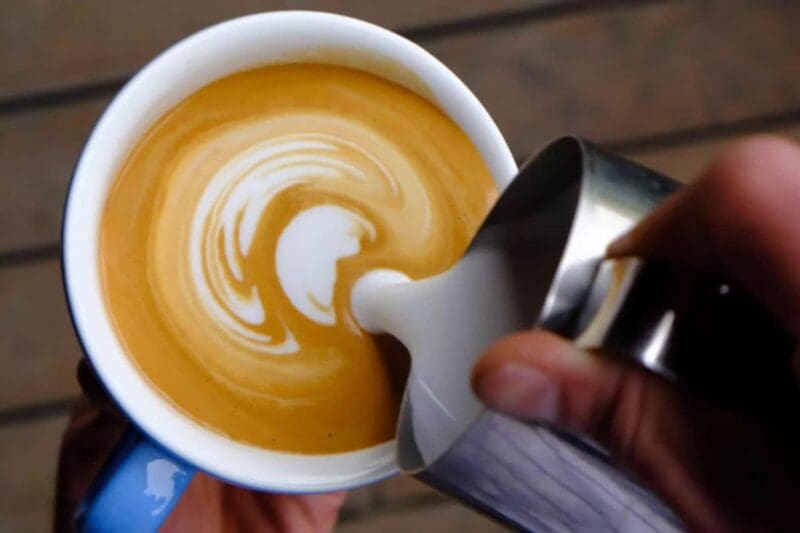
Your First Coffee with Latte Art: The Classic Heart
The heart is every barista’s starting point – and for good reason. It teaches you the fundamental pouring technique, helps you understand milk flow, and looks absolutely charming in your morning coffee.
Step-by-Step Heart Tutorial
- Start by holding your cup at a slight angle and pour from height (about 10cm above the cup) to let the milk sink beneath the crema without marking the surface.
- Fill the cup about halfway, pouring steadily in the centre.
- Now for the magic: lower your jug close to the surface (about 2cm away) and increase your flow rate slightly – you should see a white dot appear.
- Keep pouring steadily in one spot, letting that white circle grow bigger.
- When your cup is almost full, lift the jug and cut through the centre of your circle by pouring a thin stream from height straight through to the far edge.
There’s your heart! It takes practice to get the timing right, but even wobbly hearts taste delicious.
Troubleshooting Common Issues
- White dot won’t appear? You’re probably pouring from too high or not increasing your flow when you lower the jug. Get closer to the surface and pour more confidently.
- Heart is tiny or disappearing? Your milk might be under-stretched (not enough foam) or you’re filling the cup too full before creating your pattern – aim to start your design when the cup is 60-70% full.
- Pattern looks messy or streaky? Check your microfoam – it should be glossy and uniform with no visible bubbles. Give it another good swirl before pouring, and make sure you’re tapping out those bubbles after steaming.

Progressing Your Latte Art Skills: The Rosetta (Fern)
Once you’ve mastered the heart, the rosetta (also called a fern or leaf) is your next challenge. It’s the pattern that really looks impressive, with its delicate leaves cascading down the cup. The technique builds directly on what you’ve learned, but adds a rhythmic side-to-side motion that creates those beautiful layers.
Building on Your Heart Technique
The rosetta starts exactly like your heart:
- Pour from height to fill the cup about halfway, then lower your jug close to the surface to create that initial white dot.
- But here’s where it differs – instead of keeping your jug still, you’re going to move it backwards towards you while simultaneously wiggling it side to side. The backwards motion pulls the pattern down the cup, while the wiggle creates those lovely leaf shapes.
- As you near the rim, lift up and cut through just like you did with the heart, creating that distinctive stem. Think of it as a heart that dances.
The Wiggle Technique Explained
The wiggle is all in the wrist – small, quick side-to-side movements (about 1-2cm in each direction) while you slowly move the jug backwards. Start with a slow wiggle to get comfortable, then gradually speed it up as you gain confidence; faster wiggles create more leaves, slower ones create fewer, larger leaves.
The key is keeping your flow rate consistent throughout – if you slow down too much, your pattern will break up and look messy. Keep your movements smooth and rhythmic, almost like you’re conducting music. Your first attempts might look more like wobbly worms than elegant ferns, but stick with it – the muscle memory will click, and suddenly you’ll be pouring rosettas that would make any café proud.
Top Tips from Cornish Baristas
We’ve gathered wisdom from talented baristas across the country who’ve poured thousands of hearts, rosettas, and tulips. These are the insider tips that separate good latte art from truly great coffee – the little details that make all the difference when you’re learning at home.
Practice Makes Perfect
Your first twenty attempts probably won’t look Instagram-worthy, and that’s absolutely fine. Professional baristas practice on hundreds of coffees before their muscle memory kicks in. The good news is that every “failed” latte art attempt still tastes delicious, so there’s no waste – just enjoy drinking your practice runs.
Keep Your Milk Fresh and Cold
Always start with milk straight from the fridge – cold milk gives you more time to texture it properly and creates better, more stable microfoam.
Check your milk’s use-by date and give it a sniff; fresh milk steams beautifully, while milk that’s past its best simply won’t perform the same way, no matter how good your technique is. Once opened, Trewithen milk stays wonderfully fresh, but always store it at the back of your fridge where it’s coldest.
Clean Equipment is Happy Equipment
Purge your steam wand before and after every use – a quick blast clears any milk residue and prevents bacteria build-up. Wipe the wand with a damp cloth immediately after steaming (before the milk bakes on), and give it another purge to clear the internals. Clean equipment not only lasts longer but also performs better, giving you consistent results every time you brew.
Creating Your Morning Coffee Ritual
Coffee with latte art isn’t just about the end result – it’s about slowing down and savouring the process. Take a few extra minutes each morning to grind your beans, steam your milk mindfully, and pour with intention. There’s something wonderfully grounding about the ritual: the hiss of the steam wand, the swirl of cream meeting coffee, that moment of satisfaction when your pattern comes together. Whether it’s a perfect rosetta or a wonky heart, you’ve created something with your own hands using quality Cornish ingredients. That’s worth celebrating with every single sip.

Where to Find Trewithen Milk
Ready to elevate your coffee game with proper Cornish milk? You’ll find our Cornish Gold and Barista milk in supermarkets and independent shops across the South West and beyond. We’re proud to be stocked by retailers who share our passion for quality, local produce – because great coffee deserves nothing less than the finest milk.
Stocking Up on Barista Milk
Our Barista milk and Cornish Gold whole milk are available at Sainsbury’s, Tesco, Ocado and selected independent retailers throughout Cornwall and the wider UK. Use our online store locator at trewithendairy.co.uk to find your nearest stockist. Stock up, stay fresh, and never run out of the secret ingredient to perfect coffee again.
Conclusion
So there you have it – everything you need to start creating beautiful coffee with latte art in your own kitchen. Remember, every barista started exactly where you are now, with wobbly coffee hearts and determined practice. Whether you’re pouring your first heart or perfecting your tenth rosetta, take a moment to appreciate what you’ve created before that first sip. Now grab your jug, steam that gorgeous Trewithen milk, and let’s make some coffee magic happen. Your morning ritual will never be the same again.
Can you do latte art with instant coffee?
Unfortunately, no – instant coffee doesn’t produce crema (the golden foam layer that espresso creates), which is essential for latte art. Without crema, there’s no canvas for your milk patterns to show against, and the designs will simply sink and disappear. You need proper espresso from an espresso machine or at minimum a strong coffee base from a moka pot, though moka pot coffee won’t give you true crema either, making latte art very difficult.
What type of coffee is best for latte art?
Espresso is essential for latte art because it produces crema, which acts as a canvas for your milk patterns. A well-pulled shot with thick, golden crema will give you the best results and most defined designs.
What does latte art mean in coffee?
Latte art refers to decorative patterns created on the surface of espresso drinks by pouring steamed, textured milk in specific ways. Common designs include hearts, rosettas (ferns), and tulips, all created through careful pouring technique and milk control.
What are the 4 steps of latte art?
The four key steps are: 1) Pull a quality espresso shot with good crema, 2) Steam milk to create silky microfoam at 60-65°C, 3) Pour from height to fill the cup without marking the surface, and 4) Lower your jug close and increase flow to create your pattern.
What is the best milk for latte art?
Whole milk (full-fat) is best for latte art because its higher fat content creates stable, creamy microfoam that’s easier to pour and holds patterns beautifully. Trewithen Cornish Gold whole milk or our specially formulated Barista milk both deliver exceptional results with rich, velvety texture.
Can you make latte art with semi-skimmed milk?
Yes, you can create latte art with semi-skimmed milk, but it’s more challenging. Semi-skimmed has less fat, so the microfoam is lighter and less stable, making patterns harder to form and more likely to fade quickly. Whole milk is much more forgiving for beginners.
What’s the difference between barista milk and regular whole milk?
Barista milk is specially formulated with an optimised balance of proteins and fats to create consistently perfect microfoam for latte art. While quality whole milk like Trewithen Cornish Gold works beautifully, Barista milk stretches more easily, textures more uniformly, and gives professional-level results every time.